


PREPARATION TO THE EARTHSHIP ACADEMY:
Job Site Safety and Tools
Welcome to Earthship Biotecture’s Eco Construction Training! We’re so glad to welcome you into our dynamic community of visionaries. In preparation for your journey alongside our crew, please read through the following to best prepare yourself for building safety, process, procedure, and general job site etiquette.
What YOU Bring (Also listed in the info pack that we emailed you):
Water- Bring a refillable water bottle with your name on it
Sunscreen/hat for hot weather
Keep in mind that a hat with a bill (like a baseball cap) will reduce your visibility of low hanging boards and other obstacles on the site.
Clothing layers for rough weather
Take into account that the weather on the mesa shifts rapidly depending on the season. Do some online research on what to expect weather wise in Taos for your academy season. We get rain, snow, hail, wind, and sun (sometimes all in one day) so plan accordingly: i.e. UV shirts, bandana, windbreakers, rain coats, ski goggles (to prevent mesa dust in the eyes), ‘noseeum’ mesh layers, etc.
Shoes with decent tread (steel-toed boots are NOT necessary…Shoes ARE 100% necessary)
A basic tool kit at EB is composed of the following:
4+ pairs of rubber gloves
1 pair of leather gloves
Tool belt
Linesman’s pliers
Grouting sponge
Hammer (16 oz minimum)
PPE (Personal Protective Equipment): Eye/Ear/Face protection, Necessary for using power tools, mixing cement, driving nails, and general construction site use. DO NOT bring your expensive shades. They will get scratched. Ski goggles tend to work sufficiently. Ear plugs and Dust Masks.
Small speed square
Metal snips
Pool Trowel (10”, 12”, 14”)
Cement hawk
Carpenter pencil
Black permanent marker
Utility blade & knife
Retractable measuring tape (25’ is plenty; inches + cm would be good if you’re not familiar with the Imperial System)
Other options include: chalk line, needle nose and regular pliers, screwdrivers, & torpedo level
If bringing your own tools be sure to mark them with your initials to keep track of your belongings
Power Tools
A variety of corded and cordless tools are used on site. We begin the academy with a course establishing proper use and safety of the primary tools used on our build sites. If you come across a tool of any sort that you are not familiar with using ASK for a run through before proceeding. Injuries to yourself or the tools are avoidable.
The typical power tools used during the academy are table saw, chop saw, and circular saw. Also corded and cordless drills, impact drivers, grinders, nail guns, electric metal shears, etc.
Before using any power tool, (for the love of all things good and holy, PLEASE) observe your surroundings.
Are your dreads pulled away from the work surface? Are you wearing proper eye protection? Is there anything you might damage underneath the item you’re cutting, drilling, driving through that should be resituated? Where are the rest of your limbs? Have you checked your measurements twice so you only have to cut once?
Go slowly, line up your angles/cut line, situate your body directly over where you’re working and use your whole body, not just your hands.
Heights
You will often be working off of the ground at heights– on scaffolding, ladders, step stools, or roofs. When setting up your work space, clear any rocks or debris from under you to ensure you have a flat or relatively level base to place to situate your ladder/scaffold securely. The angle of your ladder should not be too steep or narrow. Give the platform a little jostle before climbing with your full body weight to check it’s stability. NEVER leave tools on the top of a ladder and always be mindful when working on or around scaffolding that tools or building materials are secured. Sounds like common sense but work methodically, with intention, communicate clearly with those working around you, and never cross underneath an at heights work space. If you encounter windy conditions, ground the ladder between uses.
Job Ethics
Construction sites become like family. Like all relationships, there are boundaries. With respect being an essential part of developing communities, here are a few tips on job site communal life.
If you need to borrow a tool, ASK FIRST and (after being granted permission) give a projected time of when the tool will be returned. We’re on the same team, there’s no competition for completion. With that said…
SHARE. If you don’t feel comfortable with others using your tools (if the items support your livelihood for instance) you might want to consider bringing only the items you feel less precious about sharing.
Return borrowed tools cleaned.
If a tool is damaged while you’re using it, please tell the owner.
Write your name on your personal items: gloves, water bottle, and any tools that are yours. This minimizes confusion and waste. Wash your gloves and buckets regularly and after each work day to prevent the waste heap of worthless cemented reusable gloves and materials destined for the landfill.
Don’t assume that a fellow crew member does or does not have experience. Ask if they would mind hearing an observation before (**AHEM, mansplaining**) asserting your personal belief on how to best use a tool. THAT IS of course, unless someone’s safety is at risk.
LOOK OUT FOR ONE ANOTHER. We’re a team. Let’s aim for everyone getting through the academy with all of their limbs attached.
Move safely and with observation through space. Construction sites overflow with hazardous obstacles innately–hoses, extension leads, saws, blades, raw work materials, etc. Do what you can to prevent any obstructions for your safety and that of your team.
Clean up after your work site. Leave it more organized than you found it and be sure to check in with your team lead to see that each tool is properly returned to its rightful owner.
ASK QUESTIONS! It’s your educational experience. Our crew is here to help you learn and grow. There are no dumb questions. Claim your educational experience and ASK away!
Have a fun time. Get to know new folks, enjoy some tunes, and make this experience one that will be memorable for a lifetime.
Tools Used at Earthship Biotecture Academy:
Shovel: generally a round-tipped, long-handled variety. Used for shoveling dirt into tires. When shoveling for long periods of time remember to bend with your legs so as to not strain your back. Work gloves may help in avoiding blisters developing on your hands.
Pick/Mattox: A tool that has a pointed end on one side and a flat blade on the other. Used for breaking up course ground, digging ditches, removing rocks, etc. The blade end can be sharp. Use with care.
Sledgehammer: Used to pound the dirt into the tires. We typically use a 8# version, although the 6# and 10# are also available. When using a sledge to pound tires, make sure to give at least one tire distance between you and anyone else working on the wall to avoid the risk of injury. DO NOT swing over your head. A smaller, more economical motion is better and you’ll sustain your energy for longer. Tire pounding is all in the technique, not in brute strength. If pounding tires on a high wall, the safest method is to straddle the tire you’re working on. Mind your footing.
Level: You’ll be using a 4’ level when pounding tires to level the courses and plumb them vertically. They’re also used to plumb can walls. Keep in mind that if the bottom edge of the level is not clean, the read won’t be accurate.
Tin snips: Used for cutting wire, sheet metal, and cutting metal lath. Metal lath comes in 2’x8’ sheets and is a diamond pattern. Lath has two factory edges on the long sides before it’s cut. The ends are incredibly sharp and will deliver nasty cuts. ALWAYS wear work gloves when cutting metal. Cuts should always be made with the diamonds running vertically otherwise the lath is too weak and will stretch. Cutting lath can be made easier if you hold down the part of the sheet that is being cut. For example, when cutting a long strip from a full sheet it helps to step on the sheet and move your foot up as the cut progresses. Pulling up on the cut piece will make the blades go through more easily, quickly, and with greater control.
Lath is used in the tire pounding phase to form cement spacers or half tires in the places that naturally arise out of the tire layout. Sometimes, we use a small flexible tire to “squeeze” into these spaces or other times we fashion a cement block, forming it either with lath or lately cardboard to save on lath.
Lath is also used later in the build wherever lumber is attached to masonry. An example being a technique called bullnosing uses lath to form a crack-free attachment to a door frame. Lath “tabs” are small strips of lath inserted into a can wall while it’s being built, nailed, or screwed onto lumber framing to receive a can wall.
Screws or nails are used when attaching lath to tires. Nailing into a tire is no easy task so using pliers (preferably needle nose) to hold the nail is extremely helpful for the sake of your fingers. The nails tend to bounce off of the tire rather than going in. Just like everything, it takes practice so do what you can to save your hands.Attaching lathe with screws is much easier but access to drills isn’t always accessible so having the ability to do both is helpful. When using screws, the diamond holes in the lath are larger than the screw heads so using 2 screws to “lock” the connection.
Porcupining is a method to attach masonry to another non-masonry surface, similar to lath tabs. Nails and screws are also used to porcupine on tires and lumber and are situated about 8” apart.
Wheelbarrow: The use of this tool might require a bit of practice to learn how “drive”. Here’s a few tips to help your wheel barrowing journey.
When loading a wheelbarrow, be sure to load the bulk of the load near the front of the barrow (the furthest from the handles). Don’t load the wheelbarrow too full until you know what you’re comfortable with moving. When loading, it’s helpful to have the wheelbarrow facing the direction you’re planning to go perpendicular to the mixer. When walking with a loaded barrow, keep the handles down more or less level with the ground. If you have to jump a door frame or other obstacle, you will lower them even more. If you have to go down a hill, you can lower the handles to the point that the back supports drag slightly to the ground and act as brakes. When turning around, lift the handles up sharply and you’ll be able to pivot the entire barrow easily.
Dumping the load is done by lifting the handles straight up quickly. If you’ve used a wheelbarrow for cement, be sure to clean it thoroughly when you’re wrapping up cement usage for the day. Dump the cement water in a place away from the building, in the road or on the back of the berm.
Sometimes instead of using a cement mixer, concrete or adobe will be mixed in a wheelbarrow, especially if only a small amount is needed. Shovels can be used to mix these loads, or even better, a mortar hoe if available. Be sure to mix all the dry ingredients well first before adding the water slowly so as to not add too much.
If you are working with cement and have a load delivered to you but no extra wheelbarrows available, it’s efficient to have a cut piece of plastic layed out for the delivered cement to be dumped onto. Otherwise, if wheelbarrow shortage isn’t an issue, your back will thank you working directly from the raised few feet.If working in the sun, you can prevent the cement from hardening quickly by covering it with something (i.e. a scrap of ply, cardboard, insolation, etc.)
If working with cement and approaching a breaktime, try not to have too much cement on hand.
If the cement that you were working with does become stiff, you can add small amounts of water to loosen it.
This is especially important in can laying. Too stiff of a mixture will make laying cans significantly more difficult than necessary. Just like cooking, the right recipe will make for the best results.
- Cement Mixer: Mixing cement is a valuable building skill and requires a bit of experience to mix correctly. The following is one approach to mixing cement.
American bags of cement generally weigh around 96 pounds. To avoid injury, we encourage the bags to be cut in half.
The usual mix for concrete is 3/1: 3 parts sand to 1 part cement.
A full load of concrete is composed of ½ bag of cement (or the equivalent of 6 shovels full) and 3x 5-gal buckets full (similarly, 18 shovels full of sand). In an effort to alleviate back strain, move the sand in half-bucket increments or individual shovels full.
NEVER put a shovel in a cement mixer- unless you wish to break a limb. Engineering fibers are also added to the mix to prevent the concrete from cracking– just a handful is enough.
Depending on the size of the job you can mix smaller loads of concrete just remember the 3/1 ratio.
Cement Mixing
Step-by-step:
Fill the turning mixer with a small amount of water. Start with less, you can always add more.
Add fibers
Start adding sand
If doing a 6/18 mix, add about 12 scoops of sand (or 2 buckets)
Add the ½ bag of cement and allow the mixture to blend for a while
Add small amounts of water at a time and observe the consistency. For plaster, you want the consistency to be about the viscosity of cake icing. For can work, aim for the cement to be about the consistency of…..
Cutting a bag of cement is a skill in itself. Laying it down on the ground or on the existing pallet of cement, use the utility knife down the middle of the shortest dimension of the bag, then with some type of stick (we tend to use rebar) inserted underneath the middle cut mark, pull up sawing back and forth. Expect a mess the first few times. It takes a little practice. After being cut in half, the bags should be able to stand upright on their own and be significantly easier to load into the mixer.
Wear rubber gloves when using cement. If working with cement for an entire day, some people rub some Vaseline or similar waterproof type cream or an extra pair of surgical gloves layered on the inside to prevent cracked skin. This might make putting your gloves on more of a challenge but your skin will thank you. It helps to have an extra pair of gloves to rotate between because your hands will likely get damp. The glove line at the top of your gloves can be a trouble spot for beginning cement workers. Some people have developed cement sores above their wrists. Take care in handling cement and keep your gloves dry and reasonably clean.
Now the fun part; cleaning the mixer! If not cleaned properly, the mixer will be full of hardened cement and eventually cause this essential machinery to break. Allow for enough time at the end of the day to clean the inside and outside. It’s super important to clean all of your tools, mixer, wheelbarrows, buckets, and trowels after cement work. Tools that aren’t taken care of become worthless quickly and make the work harder than necessary.
To clean yourself up after cement work, use white vinegar and rags. The vinegar is helpful to restore the proper PH to your skin after exposure to cement, which is very alkaline. Even if cement doesn’t touch your skin, simply being around it will deplete your skin and hair of moisture. Pouring vinegar on your hair when showering after work will diminish the dry, straw-like feeling.
Tire Pounding
First step is picking your tire. Generally, we use 15” tires. (This measurement is indicated on the stamp as the third unit.) Tire sizes are stamped on the rim. The sizes look like this:
205 60R 15; 205 75R 15; 215 60R 15; 215 75R 15; 225 60R 15; 225 75R 15; 235 75R 15
Courses are ideally built with the same size tire throughout to make the interior wall a uniform finish. Bottom courses and end walls often use smaller 16” tires, such as the 215 75R 16. Upper courses (depending on the height of the wall) tend to use some 14” tires. We almost never use 13” or 17” tires. The 235 75R 15 is the gold standard tire.
You then need enough cardboard in the center of the tire to prevent the dirt from falling out of the center when placed on the wall.
Earthship Terminology
TIRES:
260,000,000 scrap tires are produced each year in the United States.
215-75-R15(27.7” x 8.5”) up to 235-75-R15(29.0” x 9.3”) are the optimum size for consistent course leveling.
Burning a course: The process of laying in rows of tires to raise building elevation.
Stepping: When tire work starts low and steps up to a higher level or high going down. Tires stepping up or down must sit on level, undisturbed earth.
3 tire turn: Three tires turning to cut through a right angle to enhance stability in the corners.
90 degree turn: Tires follow a right angle based on string layout.
Base course: The first group of tires set on undisturbed earth usually all the tires are the same size.
Stagger: The tires need to be staggered like bricks or blocks. Ideally centered over the two tires below.
Batter: The process of setting each new row of tires back from the inside of the house, out. This is typically an inch and a half per course.
Butt: Tires must be pressing against each other to create a friction bond.
Squishy: When the natural stagger creates a gap, it can be filled by squishing a tire in between two finished tires.
Half tire: Half of a tire to span a small area at the end of a stem wall. It’s recommended to use a retread tire that is found on the freeway to prevent releasing toxins through cutting.
Lathe basket: A basket made of lathe that is filled with cement and large rocks for displacement.
Stem wall: A row of tires that end without connection. Usually used as a footing for exterior greenhouse. Must be insulated and have a vapor barrier installed.
Retaining wall: Wing walls made of tires that hold back the burial.
OTHER RECYCLED MATERIALS
Earthships use recycled materials whenever possible. The most common are the following:
Bottles (plastic and glass)
Cans (aluminum and tin)
Cardboard
Scrap metals
Scrap insulation
Recycled windows and doors
THERMAL WRAP AND VAPOR BARRIER
The thermal wrap and vapor barrier work together to form a “jacket” that insulates and waterproofs the berm.
Rigid insulation: This is an R10, water proof board. The waterproof feature allows us to install it into the earth berm.
Straw bales: Recommended for dry climates but still require a plastic wrap.
Cardboard: Cardboard has R-value and with the proper thickness can achieve R-20 but is recommended to be assembled in contractor bags.
Scraps: Pieces of rigid insulation sandwiched together in a construction bag.
BOND BEAMS
A bond beam is a continuous beam of rebar steel and cement that connects the roof to the tire work to satisfy the structural engineer inspections.
Dimensions: The interior pour dimensions are 10” by 10”.
Pins and staples: Used for “Simple survival” design to connect the ferro cement vault to the tire work. Usually a free form with cement to bond the cage to the tires. All pins and staples must be painted with Rustoleum paint to prevent steel from corroding.
ROOFING STRUCTURES
Earthships have used a variety of roof structures and it is important to understand the application and strength of the many different styles.
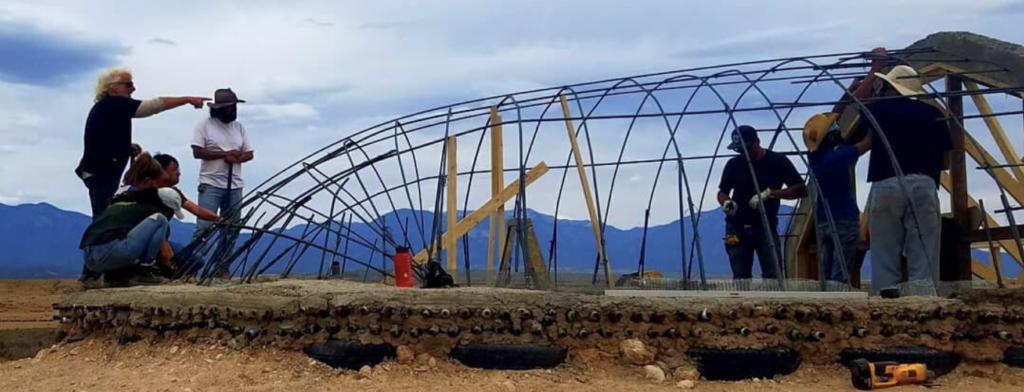
Vaults: The type used in the “Simple Survival” design. Typically installed on small U or circular shaped tire walls.
Domes: Used with the hut designs. The outer dome is a ferro cement/ birdcage structure that receives multiple coats of cement.
Cages: Bird cage type structure made with rebar, lathe, and netting.
Trusses: A framework, typically consisting of rafters, posts, and struts, supporting a roof, bridge, or other structure. This is an affordable and simplistic roof structure that allows for multiple types of insulation.
Beams: A long, sturdy, piece of squared timber or metal spanning an opening or part of a building, usually to support the roof or the floor above.
Vigas: Long trees carved and used in a structure to hold up the roof. Traditional southwestern style of roofing.
TGI (TJI) Truss: Truss joist I-beam. This is another easy to install and easy to insulate roof structure. Only a couple of people are needed to install.
PLASTERING (VAULT OR DOME ROOF)
Potato chip and spit 1” layers: Throwing small chunks of cement to create a surface to plaster upon. The purpose of this technique is to apply a light weight coat to solidify the structure before adding too much weight.
Scratching: Scratching grooves in the cement to enhance connection for the next coat of plaster.
Ferro cement: The term ferro cement, also referred to as ferro concrete, is most commonly applied to a mixture of Portland cement and sand applied over layers of woven or expanded steel mesh and closely spaced rebar.
BACK FILL AND TAMPING
Tire work will normally be backfilled with dirt and compacted to stabilize the wall.
Parapet: A small raised wall above the roof work that normally wraps around the building. A parapet helps hold snow and guide water to the cisterns.
Berm: The berm is the mass of dirt that buries the back of the house.
PACKOUT AND SHAPING
Packout: Throwing mud or cement into the spaces between tires to fill the void and to eventually bring the level to final shape coat over tires.
Shaping: Prepping plaster to a continuous flow. “Wavy gravy is better than lumpy bumpy.”
FOOTINGS
Concrete and steel that provides a structured base from which to build upon.
AGITATING
Settling the pour by creating an aggressive vibration that works the material into the nooks and spaces of the form.
CONCRETE MIXING STATION
The following materials should be placed close to the mixer.
Mortar mix: For a dry climate we use a 3 to 1 ratio of sand to Portland cement. This is used for setting bottles and cans and plastering.
Concrete mix: This is a 3 to 1 mix, but uses one inch aggregate or chip rock for enhanced strength. Two buckets of rock, two buckets of sand, and one bucket of Portland. When working with mortar or concrete we use engineered fibers for extra strength.
Plaster mix: Usually uses plaster sand and is a much more creamy consistency.
Aggregate: 1” gravel or chip rock.
Fibers: Construction fibers add strength to cement and prevent cracking.
Thermolube: Thermo-lube is used as a winter admixture that provides thermal characteristics required for a faster set and increased early strength. Reduces the time that fresh concrete or mortar needs to be protected from freezing.
Mix consistencies
Creamy: Usually indicates a mix with more water.
Stiff: Less water and sometimes with an additional scoop of sand added. Depending whether it is cement or adobe plaster.
Slurry: A very wet mix to fill in larger cavities.
Can/bottle mix (mortar): No rock and usually stiff.
Green: Cement that is still in the early curing stage. Not recommended to walk on but can still be hard troweled.
Adobe Mix: Adobe is dirt, sand, water, and straw.
Clay: Your sand to dirt ratio will be determined by the amount of clay in the dirt. Clay is the structure of adobe which can be used for building bricks or plastering.
Sifting screen: For finishes sand will need to be sifted through 1/4 inch mesh netting or even smaller.
Chopped straw: You can chop straw yourself or buy finely chopped straw. Only one person in Taos has the machine to make finely chopped straw.
Water: Needs to be fresh water. Don’t use grey or any type of tainted water.
Glue all: Adding Elmer’s glue can be added to a finished adobe plaster mix to enhance strength and reduce moisture.
Slick trowel: A final plaster coat that is smooth and uniformed and formed by using a spray bottle and pushing with a trowel.
Hard trowel: Same as slick.
Mica: A sparkling sand that can be put into Adobe.
Alize: A clay paint that requires a hand buffing.
METALS
Lathe: A type of backing material for plaster. It is the strongest mesh we use and is usually a quarter inch that is diamond shaped and forms a basket to hold and bond plaster.
Rebar: Short for reinforcing bar. A common steel bar used as a tension device in reinforced concrete and reinforced masonry structures. Half inch or #4 rebar is commonly used in Earthships.
Remesh: Provides expansion and contraction reinforcement to add strength when pouring concrete pads. Usually a 6 inch by 6 inch roll or sheet.
Stucco netting: Made from 20-gauge galvanized steel used as reinforcement for plaster, masonry, veneer, as well as other uses.
Chicken wire: 1” hexagonal mesh. 20 gauge galvanized steel.
Hardware cloth: 1/8” by 1/8” mesh, 27 gauge steel.
Door screen: Light mesh that allows for airflow and keeps the bugs out. Also used as a sifting screen material.
Bailing wire: Single loop flexible steel wire used for many applications to attach and bind. Commonly used on ferro cement designs to tie in three forms of steel.
Propanel: Corrugated metal roofing used on the Global Earthship. It collects the cleanest water. Powder coated for approved collection of clean rain water.
Galvanized: Galvanization is the process of applying a protective zinc coating to steel or iron, in order to prevent rusting.
Valley Flashing: A high gage roll of metal, also powder coated and is ideal for nonrigid structures.
Plaster stop: A formed metal product used to terminate plaster against the door, windows, or end of wall.
Drip edge: Bent metal to prevent water from reversing its flow.
CEMENT PLASTER
Brown coat: Normally the second to last coat applied to a surface. Formed by applying a smooth, thin layer of cement and then lightly rubbing the surface to create a slightly gritty surface. A float sponge or a contractor sponge is recommended for use.
Float coat: Same as above.
Slick or hard trowel: This is the final coat in which a smooth and uniformed surface is formed through use of a spray bottle and pushing hard with the trowel.
CONCRETE OR ADOBE SLABS
Finish floor: The final floor level. Must be level to all door bucks.
Subfloor: Concrete and remesh pour, 3 1/2 inches below finish floor.
Expansion/control joints: Breaks in the pour to control cracking.
Screeting: Using a straightedge to remove excess materials on a floor pour.
Cream: The moisture that has worked its way to the surface.
Acid etching: A technique of burning a stain into a concrete slab.
Ferrous sulfate: A more natural fertilizer material that provides a similar finish. No respirator or gloves required.
FRAMING
Square: A corner that has a 90 degree angle. A square corner can always be checked by using the Pythagorean Theorem. A squared + B squared=C squared. If one side is 3’ and the other is 4’, then the hypotenuse will be 5’.
Level: Having no part higher than another–flat or even surface.
Plumb: The Y-axis equivalent of water level. Straight up and down.
Flush: Completely level or even with another surface.
Racking: Pushing and pulling framework to make sure its square.
Dado: A slot or trench cut into a surface usually to receive glass.
Scribe: Marking of a line by cutting or scratching with a pointed instrument. This will usually provide a cut line for a rigid material to an organic shape.
Shim: A shim is a thin and often tapered or wedged piece of material.
Compound Mitre: Cuts angle and bevel at the same time.
Planing: To smooth or plane with a planer. To reduce a stock dimension to a thinner thickness.
Ripping: Cutting through the long side of a piece of wood.
Bullnose: A rounded convex trim created by folding the lathe over itself. This prevents a crack in the wall between a door or a window.
Lath tabs: Strips of lath attached to enhance bonding.
Perlins: It receives a fastener to create an attachment between itself and the roof structure that creates the insulation sandwich effect.
Blocking: Blocks of wood that raise level, provide support, or to create attachment sites.
Bracing: A temporary support serving to brace a structure prior to locking in framing.
Rim Joists: The final joist that caps the end of a row of joists. This creates the box effect around the perimeter of the roof structure that eventually receives the insulation and metal. It is also where we attach the gutter.
WOOD
CDX: A kind of plywood that is produced by glueing together sheets of veneer each of the layers is glued to the opposite grain of the one below it. This is the most common board used in decking or sheeting.
OSB: Oriented Strand Board. Another commonly used plywood that is very affordable.
S4S Rough sawn: The S4S designation simply refers to how many sides have been presurfaced. A S4S board is fully surfaced on all four sides.
PT: Pressure Treated wood. This wood is pretreated with chemicals to prevent rot.
Trex: Plastic composite wood
T and G: Tongue and groove. This wood is prefabricated with an extended piece on one side and a groove on the other. The pieces fit together and lock together without any space in between.
Rough dimensional lumber: Wood cut into planks that have come straight from the sawmill after drying.
FASTENERS:
ISO screws: Long screws with a square top that is made to go through insulation and into wood.
Propanel screws: Designed for fastening propanel to wood accompanied with propanel tab washers.
Trex screws: Steel, dual-threaded screws to use with TREX composite screws.
8,16 penny nails: A common 16 penny nail used in general construction today has a standard length of 3.5 inches (8.89 centimeters). It is called a penny nail because way back you could buy one hundred 10-penny nails for 10 cents or one hundred 16-penny nails for 16 cents. A 8-penny nail is two and a half inches (6.35 centimeters)
Roofing nails: A steel, galvanized nail with a large, flat head.
Galvanized nails: Nails that have been treated with zinc to prevent rusting.
Ring shank: Sets of nails for use with nail guns. Normally they are hot dipped and galvanized for corrosion protection.
Cement nails: Concrete nails are used for any work that requires nails to be driven into cement.
Dimensional lumber: Dimensional lumber is a term used for lumber that is cut to standardized width and depth specified in inches. Usually used by furniture makers.
GUTTERS
Canales: A canale is the Spanish word for canal, and is used to describe the drains or waterspouts used to move water from a roof and away from the side of a building.
Scupper: A settling area for debris in the gutter system before the water gets to the tank. This is a prefilter for water prior to entering the cistern.
Risers: The extension above either a cistern or septic tank to allow for more burial.
Salad bowl: A stainless steel bowl that is perforated to slow the flow of water for the filtering process.
CISTERNS
Polyethylene: These are the plastic cisterns used in all current designs.
Tire: A circle of tires that are packed out with cement and then wrapped in stucco netting and plastered many times on the inside. After the final coat is applied these tanks are normally painted with Thoroseal or Damtight
Metal: These tanks are made of steel. They do rust after 25 years. Typically galvanized. Like the polyethylene, these need to be insulated and buried to control temperature.
Can and cement, rebar: Like the tire cistern it is a cement tank painted with Thoroseal. Any cistern that is exposed can cause algae, evaporation and bacteria. Recirculation is recommended.
SEPTIC
Polyethylene: A plastic tank. These need to be buried.
Concrete: The standard and accepted tank. These are easily found already built and can be delivered.
Out law: A hand made and hand dug with precision septic that is usually round and a diameter is 5’ 6”. The depth is 6 feet below the inlet pipe. It is rubber lined and filled with semi-truck tires as the main baffle. Small squishy tires are used to stabilize the large tires. The lid is a hand-made, ferro cement, birdcage style.
VENTILATION
Natural ventilation: Earthships want to encounter natural phenomena and our ventilation systems bring in air through natural convection.
Skylights: Because of ventilation needs, Earthship skylights are operable and can be opened or closed according to need.
Velux: A prefabricated window system complete with a dual tilt and screen.
Transom: A hand-man, custom , and affordable window found above door passage ways. It provides access through the interior greenhouse and works with the vent tube.
Hopper: A small hand operated window found in the front of many modular Earthships.
Dormer: An operable window built into the front face of an Earthship.
Cooling tubes: Steel tubes that run through the berm and into the Earthship. The air is cooled as it travels through the berm and then is released into the house.
METAL GAUGE
It is recommended to use 26 gauge metal for gutters and more ease of bending around organic shapes. Propanel is 18 to 20 gauge for longer spans.
Wire gauge: Lower gauge number means more strength. It is recommended that you use higher quality wire for cement plaster on the tire walls.
Mil: Mil is not to be confused with mm. It is 1/1000 of an inch or .001
ROOFING PAPER 30 LBS
Felt roofing paper provides asphalt saturation for waterproofing and adds an extra layer of protection. 30 lbs used to mean it weighed 30 lbs per 100 square feet, now it only weighs between 16-27 lbs.
EPDM 45 MIL
Epdm is an extremely durable synthetic rubber membrane (ethylene propylene diene terpolymer) widely used in low-sloped buildings worldwide. Earthships use this rubber for roofs, grey and black water containment cells. We commonly use 45 mil EPDM but it can be made up to 60 mil. For reference a credit card is 30 mil thick.
6 MIL PLASTIC
Plastic also comes in 2,3,6,10, and 30 mil
ELECTRICAL
AC/DC: In direct current (DC), the flow of electrical charge is only in one direction. Earthships try to incorporate as much direct current (DC) electrical fixtures as possible. They use less energy and can be used even when the inverter is off. Refrigerators need to be DC as they are the most power consumptive appliance and they are on all of the time. In alternating current (AC), the flow of electrical charge periodically reverses direction. AC is the form in which electrical power is delivered to mainstream businesses and residences. To use AC in an Earthship one must turn on an inverter.
Photovoltaic: Earthships use mono-crystalline and poly-crystalline and thin film are the most commonly used photovoltaic.
Wind turbine: Wind turbines can be used in conjunction with photovoltaics in Earthships and have the advantage of being able to generate power at night or in clouding situations. The disadvantage is that wind turbines have moving parts and are susceptible to breakdowns. Photovoltaics have no moving parts thus they rarely have any mechanical problems.
Micro hydro: Micro hydro is a type of hydroelectric power that uses water power from streams.
POM: The Power Organizing Module. A prefabricated power system with breakers, inverter, charge controller.
Deep cycle batteries: A deep cycle battery is a lead-acid battery designed to be regularly deeply discharged using most of its capacity.
Charge controller: Controls power going to the batteries.
Breaker Boxes: A breaker panel, also known as a load center, service panel, breaker box or electrical panel, is a steel box that holds multiple circuit breakers wired to circuits that distribute power throughout the home.
Inverter: Converts DC power to AC.
Low voltage DC: A fail safe system that is installed to the POM to prevent over discharging your batteries.
PLUMBING
WOM: Water Organizing Module.The WOM is a prefab plumbing fixture with filters, pumps, and pressure switches.
GW board: Grey water board…The grey water board has a pump and a filter. It pumps filtered grey water to the toilet.
Recirc: The recirculation device brings hot water to sinks, thus preventing a loss of water waiting for the hot water to reach the appliances.
Four-way recycling: Water is used four different ways in an Earthship. First, the water is used in a conventional way, such as a shower or washing machine. Second, the water flows into a grey water containment cell and the plant roots use and clean the water. Third, the water drops into a well at the end of the planter and is pumped into the toilet. Fourth, the water is flushed into a septic tank and it overflows into a black water containment cell where the black water is treated and absorbed by outdoor landscaping.
Fifth Way: When the water works its way to the end of the black water cell, leftover water could be pumped out and used one more time.
Grey water: Grey water is water that has already been used once. This is water collected after showers or washing clothes.
Black water: Black water is water that comes from the toilet. Some places also consider dish washing water to be black.
We’re so excited to learn alongside you in this
journey towards reciprocity with our planet.
Looking forward to meeting you soon!
–The Earthship Biotecture Academy Team